Address
304 North Cardinal
St. Dorchester Center, MA 02124
Work Hours
Monday to Friday: 7AM - 7PM
Weekend: 10AM - 5PM
Address
304 North Cardinal
St. Dorchester Center, MA 02124
Work Hours
Monday to Friday: 7AM - 7PM
Weekend: 10AM - 5PM
最近有一位ESP32愛玩群組的網友PO了一篇把ESP32改監視器常用的RTSP協定,這樣就可以接上我家的QNAP做長期監視錄影了,那就來測試看看。
我的ESP32實做書籍:我出書了 ESP32 物聯網專題
博客來網址:https://www.books.com.tw/products/0010901195
以往利用ESP32CAM都只是短時間測試一下,主要是因為是Webserver,要自己開瀏覽器連進去才能看,最近有一位ESP32愛玩群組的網友PO了一篇把ESP32改監視器常用的RTSP協定,這樣就可以接上我家的QNAP做長期監視錄影了,那就來測試看看。
首先連線到函式庫網址:https://github.com/geeksville/Micro-RTSP
下載打包zip後,利用arduino內的功能表/草稿碼/匯入函式庫/加入.zip檔案方式安裝本函式庫。
在github中的範例程式包含LCD等配件,我都先刪除,精簡後的程式如下
#include <WiFi.h>
#include <WebServer.h>
#include <WiFiClient.h>
#include "OV2640.h"
#include "SimStreamer.h"
#include "OV2640Streamer.h"
#include "CRtspSession.h"

char *ssid = "ssid";        // Put your SSID here
char *password = "password";      // Put your PASSWORD here

WebServer server(80);
WiFiServer rtspServer(554);
OV2640 cam;
CStreamer *streamer;

//mjpeg串流
void handle_jpg_stream(void)
{
  WiFiClient client = server.client();
  String response = "HTTP/1.1 200 OK\r\n";
  response += "Content-Type: multipart/x-mixed-replace; boundary=frame\r\n\r\n";
  server.sendContent(response);

  while (1)
  {
    cam.run();
    if (!client.connected())
      break;
    response = "--frame\r\n";
    response += "Content-Type: image/jpeg\r\n\r\n";
    server.sendContent(response);

    client.write((char *)cam.getfb(), cam.getSize());
    server.sendContent("\r\n");
    if (!client.connected())
      break;
  }
}

//靜態影像
void handle_jpg(void)
{
  WiFiClient client = server.client();
  cam.run();
  if (!client.connected())
  {
    return;
  }
  String response = "HTTP/1.1 200 OK\r\n";
  response += "Content-disposition: inline; filename=capture.jpg\r\n";
  response += "Content-type: image/jpeg\r\n\r\n";
  server.sendContent(response);
  client.write((char *)cam.getfb(), cam.getSize());
}

//錯誤處理
void handleNotFound() {
  String message = "Server is running!\n\n";
  message += "URI: ";
  message += server.uri();
  message += "\nMethod: ";
  message += (server.method() == HTTP_GET) ? "GET" : "POST";
  message += "\nArguments: ";
  message += server.args();
  message += "\n";
  server.send(200, "text/plain", message);
}

//WiFi連線
void WifiConnecte() {
  //開始WiFi連線
  WiFi.begin(ssid, password);
  while (WiFi.status() != WL_CONNECTED) {
    delay(500);
    Serial.print(".");
  }
  Serial.println("WiFi連線成功");
  Serial.print("IP Address:");
  Serial.println(WiFi.localIP());
}

void setup()
{
  Serial.begin(115200);
  //設定影像大小:UXGA(1600x1200),SXGA(1280x1024),XGA(1024x768),SVGA(800x600),VGA(640x480),CIF(400x296),QVGA(320x240),HQVGA(240x176),QQVGA(160x120)
  esp32cam_aithinker_config.frame_size = FRAMESIZE_UXGA;
  esp32cam_aithinker_config.jpeg_quality = 10;
  cam.init(esp32cam_aithinker_config);
  //開始WiFi連線
  WifiConnecte();

  server.on("/", HTTP_GET, handle_jpg_stream);
  server.on("/jpg", HTTP_GET, handle_jpg);
  server.onNotFound(handleNotFound);
  server.begin();
  rtspServer.begin();
  streamer = new OV2640Streamer(cam);//啟動服務
  Serial.println("WiFi connected");
  Serial.print("Use 'http://");
  Serial.print(WiFi.localIP());
  Serial.println("/' to watch mjpeg stream");
  Serial.print("Use 'http://");
  Serial.print(WiFi.localIP());
  Serial.println("/jpg' to see still jpg");
  Serial.print("Use RTSP:'");
  Serial.print(WiFi.localIP());
  Serial.println("', URL:'/mjpeg/1' and port:554 to start rtsp stream");
}

void loop() {
  if (WiFi.status() != WL_CONNECTED) {
    WifiConnecte();
  }
  server.handleClient();
  uint32_t msecPerFrame = 100;
  static uint32_t lastimage = millis();
  // If we have an active client connection, just service that until gone
  streamer->handleRequests(0); // we don't use a timeout here,
  // instead we send only if we have new enough frames
  uint32_t now = millis();
  if (streamer->anySessions()) {
    if (now > lastimage + msecPerFrame || now < lastimage) { // handle clock rollover
      streamer->streamImage(now);
      lastimage = now;

      // check if we are overrunning our max frame rate
      now = millis();
      if (now > lastimage + msecPerFrame) {
        printf("warning exceeding max frame rate of %d ms\n", now - lastimage);
      }
    }
  }
  WiFiClient rtspClient = rtspServer.accept();
  if (rtspClient) {
    Serial.print("client: ");
    Serial.print(rtspClient.remoteIP());
    Serial.println();
    streamer->addSession(rtspClient);
  }
}
程式燒錄完畢之後,就開通兩個功能1.web mjpeg串流 及 2.RTSP串流,目前的程式兩者同時只能有一個連入,使用web連上後,rtsp會自己斷掉,當web關閉後,rtsp會重新啟動。
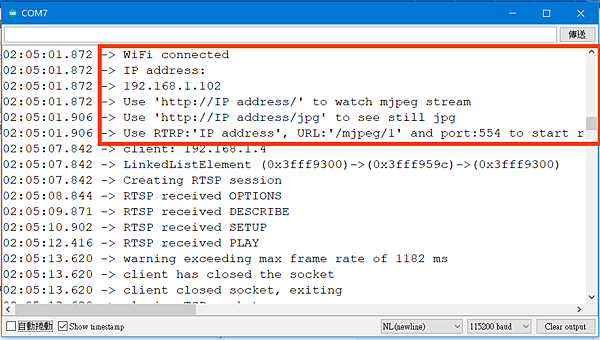
程式啟動後,序列埠的訊息如下,會通知您的ESP32取得的IP,還有指示要如何查看stream及設定RTSP
我們可以先用WEB連看看畫面正不正常,內容不像預設的CameraWebServer範例那麼多功能,就只有一個畫面做串流而已。

那麼如果你有synology或qnap這類的機器該如何設定錄影功能呢?
我這裡以qnap的Surveillance Station為例

1.開啟Surveillance Station
2.新增一台攝影機,選擇以下參數
廠牌:Generic Model
機型:Generic JPEG
URL:/mjpeg/1
名稱:任意輸入,例如倉庫、書房
網路位置:取得的IP
埠號:554

觀察連線狀況正常

利用qnap的播放器也很正常

錄影部份也相當正常,都沒有斷線

筆者將ESP32CAM開啟約一週,錄影一直都正常。不過發現RTSP的fps比http來的快,而一週測試下來,ESP32摸起來也只是溫溫的而已,並無發燙。
若要使用Python讀取rtsp影像做AI辨識,可以參考本篇:使用Python讀取ESP32CAM的RTSP串流
以上報告